As part of my recent repair and maintenance jag, here’s a video showing how to replace the dead batteries in an old Quantum Battery 1. Even though this is more than 30 years old, these batteries are still quite useful in powering modern flashes.
Category Archives: How to
Notes for DAM Europe presentation – Getting Real with AI and ML
Lightroom
If you don’t already have it, you’ll need to get Adobe Lightroom Classic (or one of the previous version of Lightroom 5.7 or later. This comes with an Adobe Creative Cloud subscription. There is also a “photographer’s plan” which is £9.98/month in the UK that gives you Lightroom and Photoshop. Here’s a link:
https://www.adobe.com/uk/creativecloud/photography.html
Anyvision Plugin
http://www.johnrellis.com/lightroom/anyvision.htm#overview
Suggested workflow
Prior to testing, you need to make sure you have Lightroom Classic or other compatible version of Lightroom, download the plugin, and install.
- Create a sample collection of at least a few thousand images to test with. I suggest a broad range of subject matter and sources.
- Add these images to a Lightroom catalog dedicated to the test
- If you want to test ML tags only, strip all other info first
- Close the catalog and make a duplicat of the entire catalog. This will be useful in later testingNow let’s run the first test to see the entire universe of tags that Google might assign.
- Select all images and run Plugins>Anyvision>Analyze
- Set per screenshot below:
Some notes on the settings:
- I have set all threshold to 0 to get the largest number of tags. In all likelihood, we’re going to want to set these to a higher number like 75. (With the exception of Landmarks, which seem to include very few false positives).
- I have this set to write and OCRd text to the Headline field, which is often empty. You could also write it to the Caption (also known as Description) field. Caption is a more broadly accessible field.
- I have included the scores, which will only show up in the Anyvision panel in Lightroom’s metadata panel.
- I have checked the box to have Anyvision make letter-based subgroups of returned results to help keep the tags visually organized in the keywords panel.
- I’ve also asked it to add GPS data whenever it recognizes a landmark.
- I’ve checked the Reanalyze box, although this is only of use when running these images through a second time for comparison purposes.
- I only run the translation on the OCR text, but it you have need to make the keywords available in multiple languages, you could do that here.
Making multiple catalog
Once you’ve run the images through Anyvision, you can repeat the process at different confidence levels to see what level is optimal for your own collection and metadata usage. I did that by running it at 0, 50, 75 and 90. To run again, here’s what I suggest:
- Take the duplicate catalog made above, and duplicate it again.
- Rename the catalog for the confidence level which you would like to run the process.
- Run the process and compare
Digitizing Your Photos Webinar posted
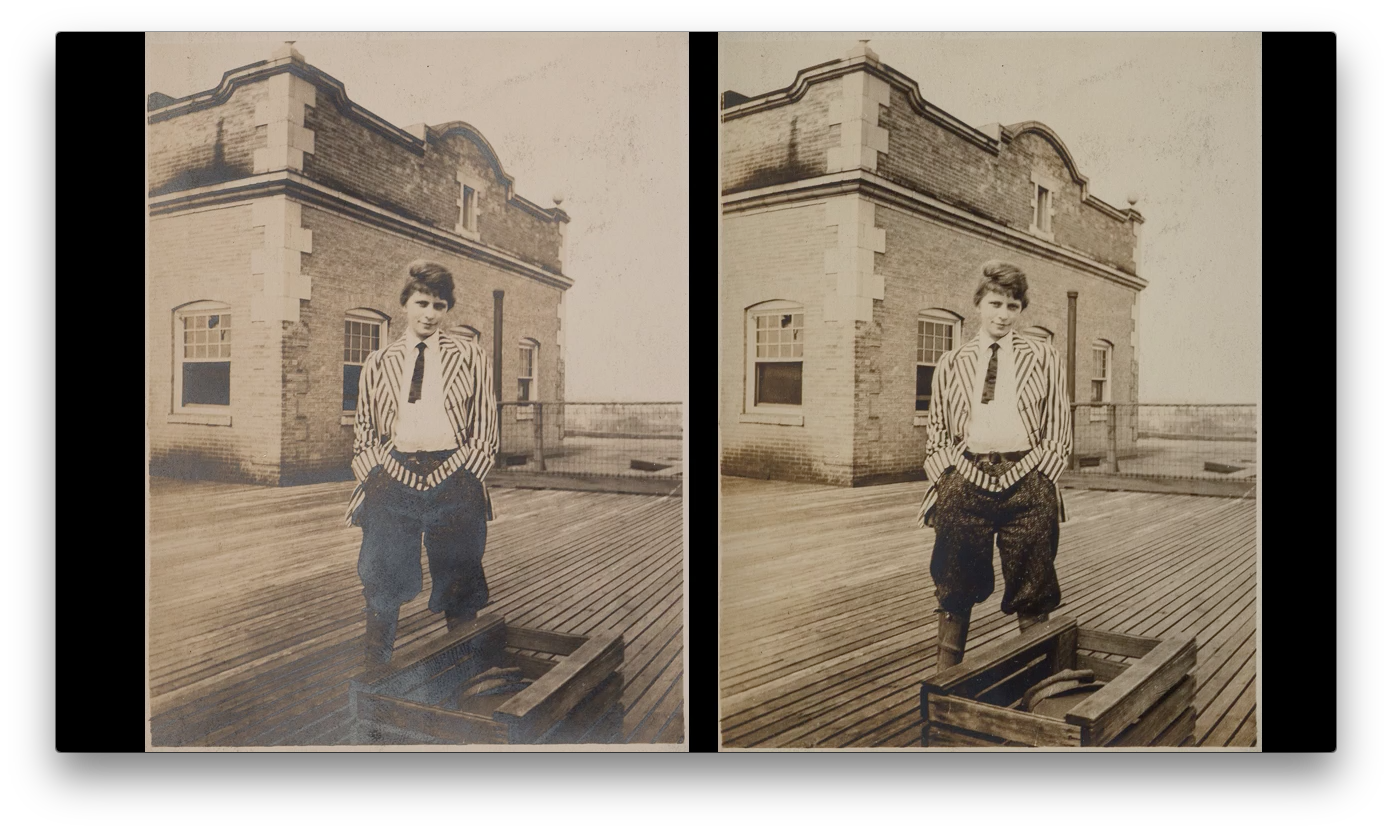
Last fall, I did a presentation at B&H on using your camera as a scanner, based on my book Digitizing Your Photos. The webinar proved a pretty detailed overview of the camera scanning process for prints, slides and negatives. For those unfamiliar with the process, or for people who have been struggling to get high quality scans, there is a lot of good information in here.
Rail Systems for Rent or Sale
UPDATE: We have a limited number of these units for sale. Contact us at support@theDAMbook.com
- Comes with 220mm rail, slide/negative stage, arca-compatible camera mount
- Base Price $300
- Longer rail – add $50
- File out back side of film stage to improve border rendering – add $25
Some additional information:
- All units are made from Nikon PS-4 and PS-5 slide/negative copy adapters. They accept standard 35mm mounted slides and unmounted 35mm film. The Nikon units are used and may show signs of wear, including blemishes on the metal and imperfections in the bellows leather.
- The standard model I have for sale has a 220mm rail, which is suitable for use of a 60mm lens (or shorter). Longer rails available for an additional cost.
- Some models have diffusers and some do not. I suggest removing the diffuser because they can attract dust. Using a light source that is far outside the depth of field can ensure a dust free light source.
- I can also file out the back side of the negative carrier for an additional $25. This allows for a slightly better black border rendering of full frame negatives.
A lot of readers are asking how to get a rail system for 35mm slide and negative copying. I’m working on some sourcing options for this. In the meantime, we’re going to offer the units that I personally own as rental items.
What we can provide
The rental is for a rail, a film stage, a generic camera plate if needed, and step down ring to allow your lens to connect to the shade if needed (These units have a 52mm lens connection.)
These units have had the rounded corners filed down to show the full frame of the image. You’ll get a natural black border on standard 35mm film.
Here’s an example of a negative scanned with a rail system and turned positive with the techniques outlined in my new book. The black border is created in-camera and shows the entire frame of the image. Note that each different unit will produce a slightly different black border.
Rail System Options
We have several styles of unit, all made from Nikon slide copy adapters. Some have the rear diffusion glass, and in some the glass has been removed.
• Without diffusion – this requires that you have a nice even light source such as a softbox or lightbox. Shooting without diffusion means there is no chance of dust particles sticking to the glass and appearing in every shot.
• With diffusion – This will make it easier for some people to make a smooth and even illumination across the frame. Note that the diffuser dust can be a real problem.
Nikon PB-6 and PS-6
I also have a Nikon Bellows unit for rent. To use this, you need a full frame small body Nikon camera (e.g. D750, D800, D810, D600, D610, D700) and a 55mm or a 60mm Nikon Macro lens.
D1, D2, D3, D4, And D5 cameras do not fit on these units.
What you need
You’ll need your own camera and macro lens, as well as a light source (strobe or LED recommended). YOUR CAMERA DOES NOT HAVE TO BE A NIKON.
Camera – Rail systems can be used with any brand or model of camera.
Lens – In order to connect the lens shade, you’ll need to use a “normal” length macro lens. This means a 50mm-60mm range for full frame DSLR and 35mm range for APS-C or micro 4/3 camera.
Digitizing Your Photos – It is strongly recommended to have a copy of my most recent book in order to get the most out of your rental. Shown below is a video from the book.
Terms
Rental is $50/week, or $150/month. You pay shipping both ways (we prefer if you can provide a Fedex or UPS account number.) When we send the unit out, we need to take a credit card deposit for $300.
If you are interested in rental, drop us a line at support@theDAMbook.com or make a Facebook comment below. Let us know whether you want a Rail or bellows system, whether you want the diffuser or not, and how soon you’re looking to get started.
Film Copy Setup – DYP Movie of the Week
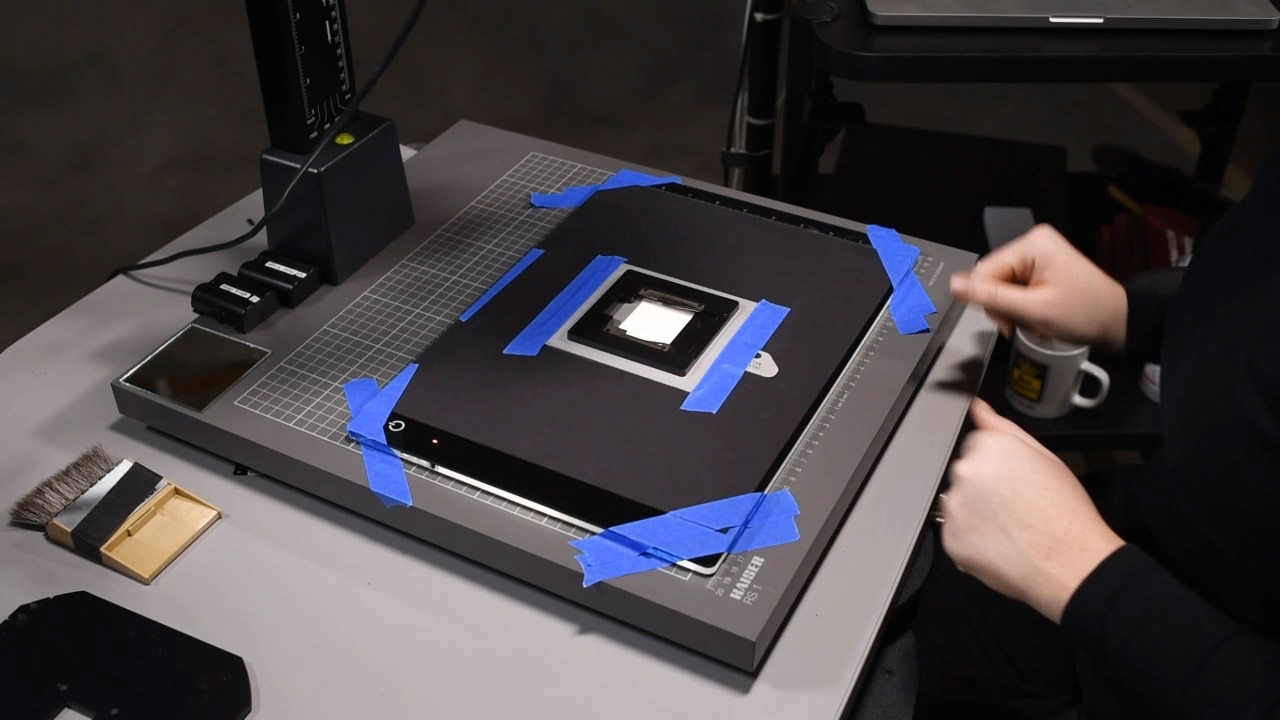
The easiest way to build a copy setup for film (slides, transparencies and negatives) is to lay a lightbox on the copy stand and then put a negative carrier on top of that. This video from Digitizing Your Photos shows you how set one of these up (including how to make sure that the camera and the film are parallel to each other.)
I cover several other setups for copying film in the book, but this one requires no special tools and can be made wth stuff that is commonly available at camera shops.
Remove Silvering – DYP Movie of the Week
This post kicks off a series of tips and techniques from Digitizing Your Photos. These posts will focus on a particular technique from the multimedia eBook, and include one of the videos from the book.
It’s common for vintage prints to exhibit Silver Mirroring (or Silvering). The reflections caused by residual silver can obscure the shadow detail in the print. Fortunately, it’s easy to remove the mirroring in the copy photo through the use of simple cross-polarization. This video shows how to cross-polarize and what the effect looks like.
This video appears on page 48 of Digitizing Your Photos with Your Camera and Lightroom.
Digitizing Your Photos – Just Released
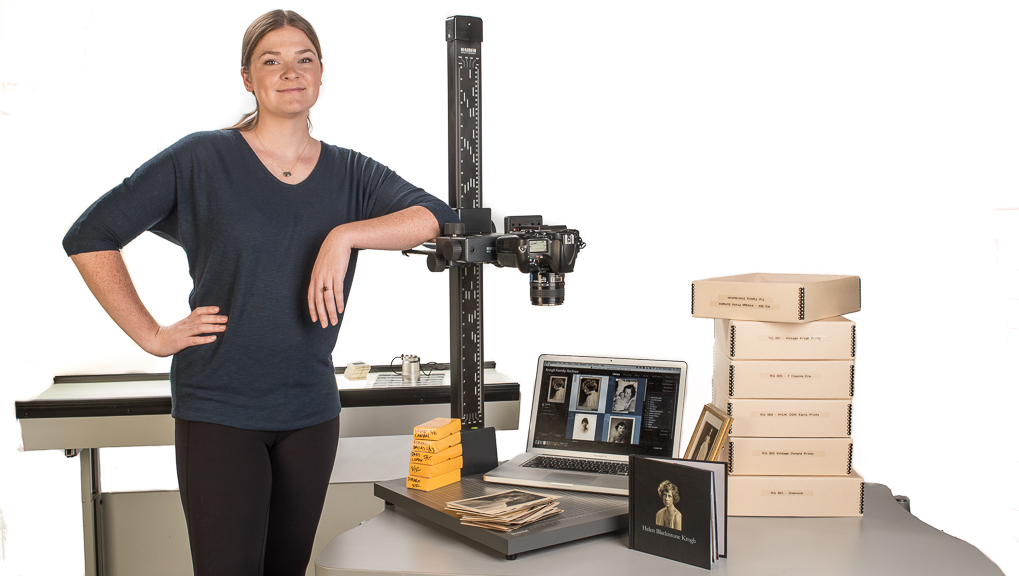
We’re excited about the release of our new multimedia ebook, Digitizing Your Photos. It presents a comprehensive method for scanning photos with a digital camera, and managing the process with Lightroom.
The book is written for professional photographers, family historians, corporate collection managers, and cultural heritage institutions. We know that great collections of slides, prints and negatives are everywhere, and we want to help preserve and make use of them.
The book runs for 248 pages, and includes 90 workflow videos for a total of 9 hours of comprehensive instruction.
Here’s the first video from the book, which outlines the entire process.
And here’s the product page.
PhotoShelter Webinar tomorrow on OYP with Lightroom
UPDATE: The Webinar is full.
I’m very happy to be bringing my Lightroom organizational philosophy of Store, Tag and Create to PhotoShelter’s popular webinar series tomorrow, Friday February 21st at 4:00pm. I’ll spend some time laying out the foundations of an organized photo library in Lightroom.
PhotoShelter provides smart web services for professional photographers and others working with professional imagery. They’ve been focused on making a great service, creating tools to promote, deliver and sell imagery for a decade. For many photographers I know, PhotoShelter provides a turnkey storefront that just keeps getting better. You can see how I use PhotoShelter Beam for my portfolio here.
PhotoShelter has become one of the premier photo education entities in the world, and it’s not even their core business. They understand that professional development benefits the entire community, and they’ve been committed to creating informative white papers, webinars, live presentations and more. I’m very happy to be a part of that effort.
If you can’t make it Friday, you can check out the webinar on-demand.
This video shows how Beam works, and I think it’s a really well-done demonstration. I actually made my new portfolio site using the video below as the only guide. (I also used Lightroom’s Publish Services to upload and update the photos, and I show you how to do that in Organizing Your Photos.)
Folders, Keywords or Collections?
When people are faced with organizing their photos in Lightroom, they run into a question almost immediately. Which of the Library tools should they use? There are dedicated panels in Lightroom for Folders, Keywords and Collections. How do you know which one or ones to use?
I suggest that you need to think of organization in three parts: storing the photos, tagging the photos for content, and creating stuff with the photos. These three layers correspond extremely well with Folders, Keywords and Collections. The Store, Tag, Create process is thoroughly explored in Organizing Your Photos with Lightroom 5.
Store
The main job of your Folders in to enable the storage of the photos. You need a clear, easy, expandable way to store the photos and back them up. So your use of folders should be geared to storage, mostly. Of course, folder names can be useful for some simple content-based organization, such as the name of the shoot, but that’s really the job of the next layer.
Set up your folders in a simple, expandable fashion. Year/Month/Project is an excellent choice.
Tag
Keywords (and other metadata, like ratings, date and location) are much better tools for organizing your photos by content and quality. Some of these tags – like date – can be created automatically. Some – like shoot keywords or location names – can be added in bulk. These tags are incredibly useful for filtering your Photo Library down to a manageable set of photos for any given task. And those tasks are handled by the next layer.
Use Keywords and other metadata like Location tags to help you find any particular set of photos. You can easily organize your Keywords into a hierarchy so you can find them easily.
Create
In Lightroom, the Collections panel is the place to do the most important creative work to your photos. This might be a straightforward selection process, like choosing images to send out to a friend or client. Or it might be a complex task, like organizing photos to put in a book. There are a whole set of features that only Collections have which make this the best tool for creation.
The Collections Panel is the place you do the selection process. Again, you can make a hierarchy to help keep the groupings organized.
If you follow this simple construction, you’ll find that all your organizational work in Lightroom becomes easier and more efficient.
On The Photoshop Show!
Last week I was on the Photoshop Show with Jan Kabili and Ron Clifford, talking about my new book, Organizing Your Photos with Lightroom 5. I run through a bunch of the most important concepts in the book. Thanks also to my friend Sean Duggan, as well as Erika Thornes and Dave Bell for sitting in. It was a fun show (after a little bit of a rough start) that covered a lot of ground. I hope to do it again before too long.